Take an adaptive game controller, a few extra buttons, and a packing station, and what do you get? Tripled packing efficiency in your warehouse!
Introduction
Handheld barcode scanners revolutionized warehouse picking and packing. The technology is a lifesaver that reduces errors, allows for better quality assurance, and saves time.
However, there is still always a lag between picking up the scanner, scanning the barcode, and then placing the scanner down to continue working, especially in the critical packing phase of an order. Maybe it’s one or two seconds, but shave those few seconds off every order you pack, and you’ve accumulated a lot of time.
Our team spent a lot of time looking for a non-wearable option. Where could we find a durable alternative that didn’t break the bank and which also improved packer efficiency?
The answer was found in the gaming community. Xbox® released an adaptive game controller meant for gamers with limited mobility and less-than-fine motor skills. We discovered that this type of device could work for packing stations at ShipHero. When combined with a Logitech® button kit and some open-source software, a solution was born.
If you’re a current ShipHero WMS client, you too can adapt your packer stations to use game controller buttons.
Setting Up an Adaptive Packing Station
Step 1: Gather Hardware
Each packing station will require the following hardware:
This hardware can be purchased directly from Microsoft or from a retailer such as Best Buy. Prices are usually the same.
The Xbox Adaptive Controller is the core component of the packing station setup, featuring two oversized buttons that can withstand constant heavy use and extra ports for up to 15 more input sources. The Logitech kit provides 10 additional buttons that can be placed wherever needed around the packing station.
Note: While we recommend the using buttons from the Logitech Adaptive Gaming Kit for their price and guaranteed compatibility, any robust microswitch wired to a 3.5mm mono jack will work. 3.5mm jack plugs are necessary to connect to the Xbox Adaptive Controller.
Optionally, you may need this additional hardware:
- 3.5mm male to female mono extension cables (various lengths available)
A variety of extension cables will provide the range to place buttons in convenient locations.
Note: We recommend "slim" cable plugs because the input sockets on the Adaptive Controller are spaced close together. If the cable ends are too wide, there may not be enough room to plug them in next to one another.
Step 2: Configure Packing Station Hardware
By wiring a packing station with Adaptive Controller buttons, packers can instruct ShipHero’s WMS to print a label/invoice or complete an order with the press of a button.
This system uses different packaging sizes as the main differentiator. Once a package type is entered, again at the touch of a button instead of using a handheld barcode scanner, ShipHero’s WMS knows what to do.
Currently, there are 17 buttons that can be programmed with different input codes. Two of these buttons must be assigned to the functions mentioned above (print label/invoice, complete order). The other 15 buttons can be assigned as needed.
Here is an example of an adaptive packing station wired with additional buttons:
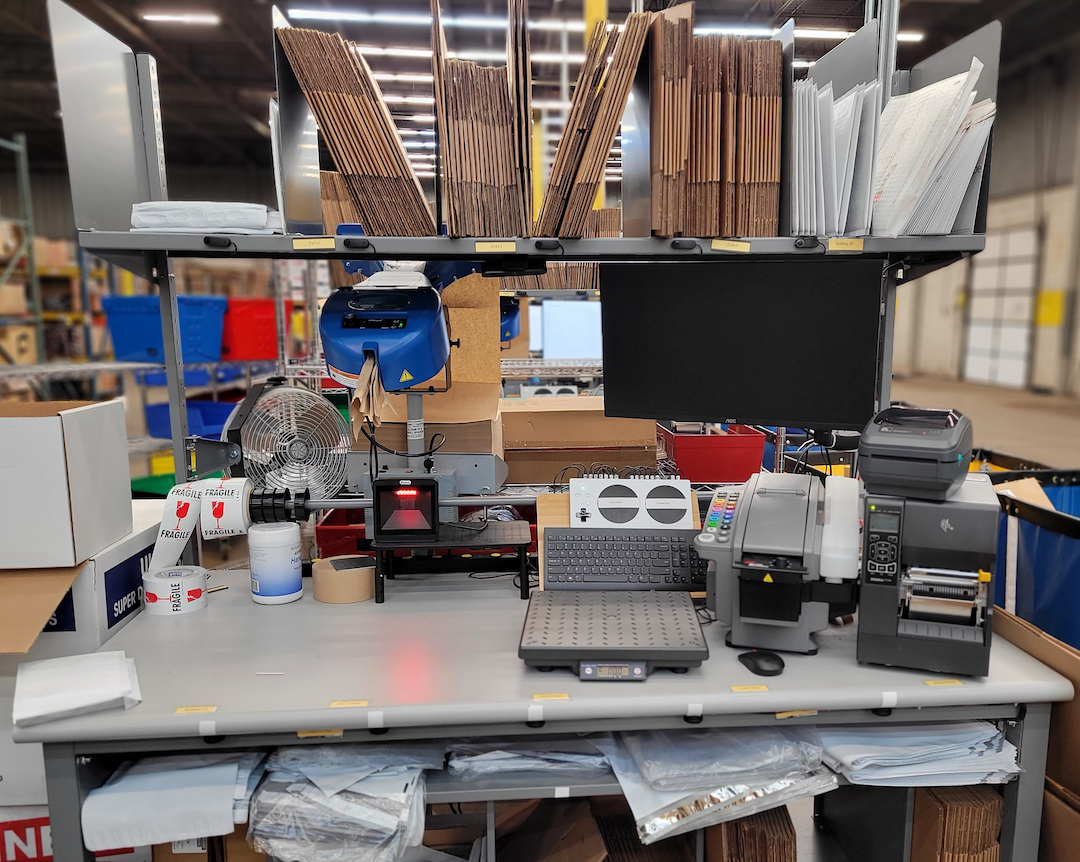
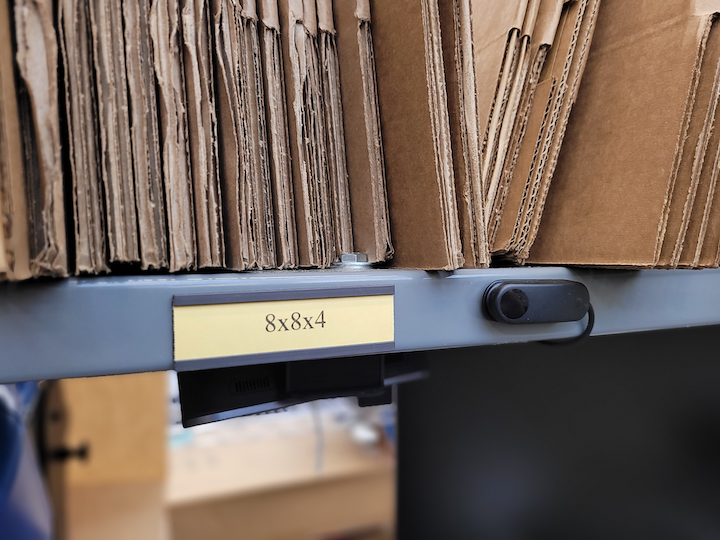
The top row of five buttons allow a packer to input box size:
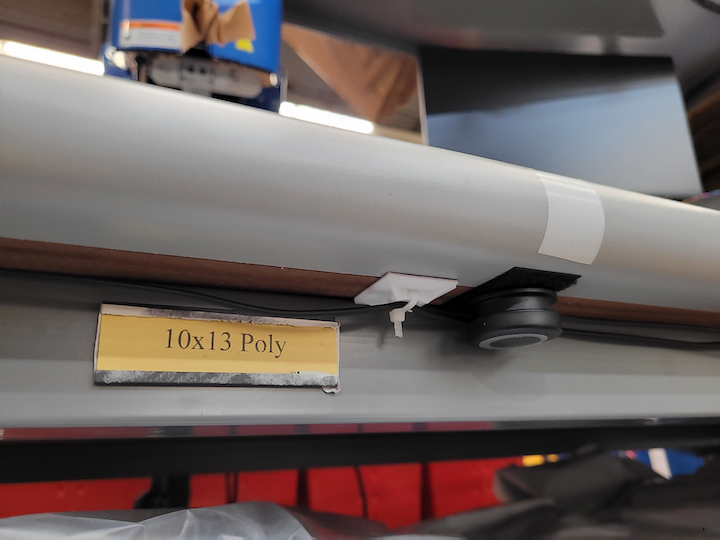
The bottom row of five buttons input the bag size:
All buttons are wired to the Adaptive Controller using 3.5mm extension cords:
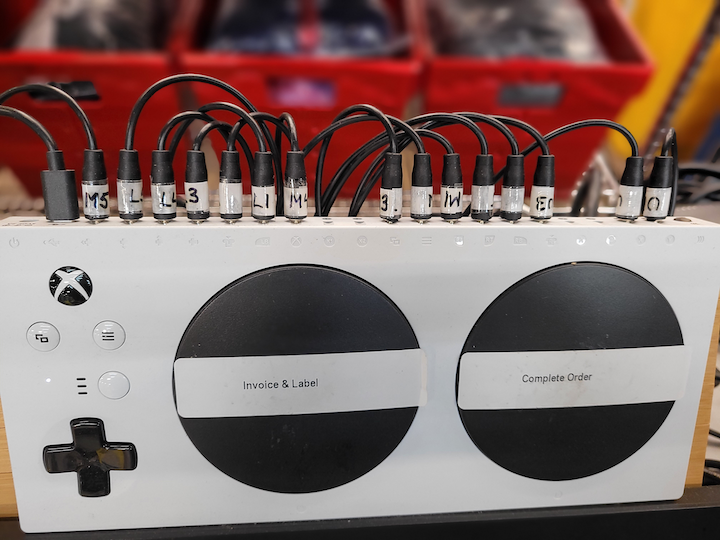
Notice that the cord ends are labeled with the button they connect to, reducing confusion.
Here you can see the adaptive packing station in action:

Watch Aaron Rubin pack an order in 25 seconds
The number of peripheral buttons will vary depending on your needs. However, if you have multiple adaptive packing stations, each should use an identical layout and number of buttons. This is important in order to streamline the configuration of and troubleshooting for the Adaptive Controller.
Step 3: System Setup
Each packing station will need to run a Windows operating system. On each Windows machine, download the following software:
AntiMicro is a free and open source program which allows you to assign custom input to gamepad buttons. To install, simply download the installer file from SourceForge, navigate to the download directory, and double-click the installer file. You will likely need administrator permission on the system to approve the installation.

After successfully running the installer, you should see a new desktop icon for AntiMicro.
Note: If for some reason you cannot use AntiMicro, other interpolating software is available. reWASD for Windows can be downloaded and configured in much the same manner.
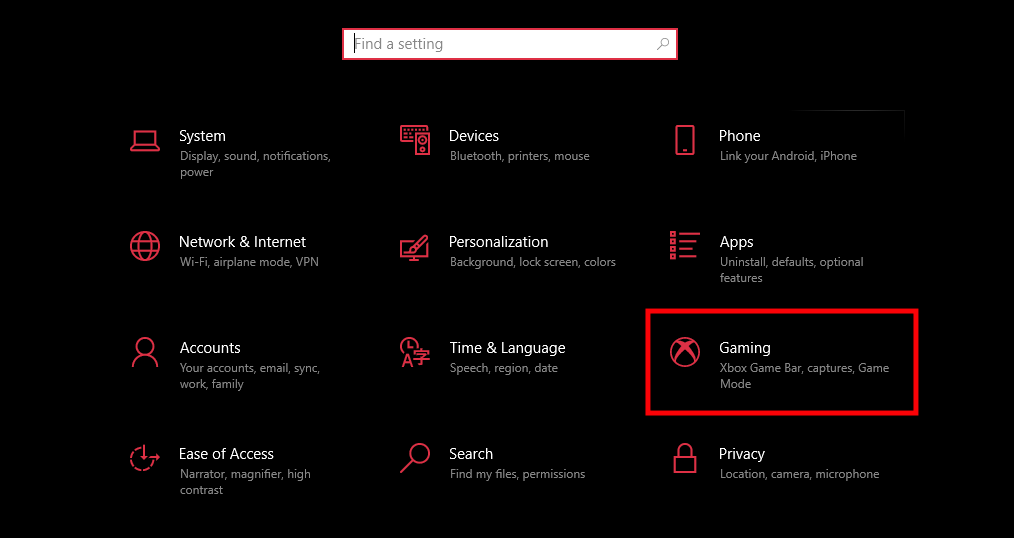
Next, configure Windows to allow use of all gamepad buttons. Navigate to Windows settings and select Gaming.
Ensure that the Xbox Game Bar is switched Off and that the option Open Xbox Game Bar is unchecked:
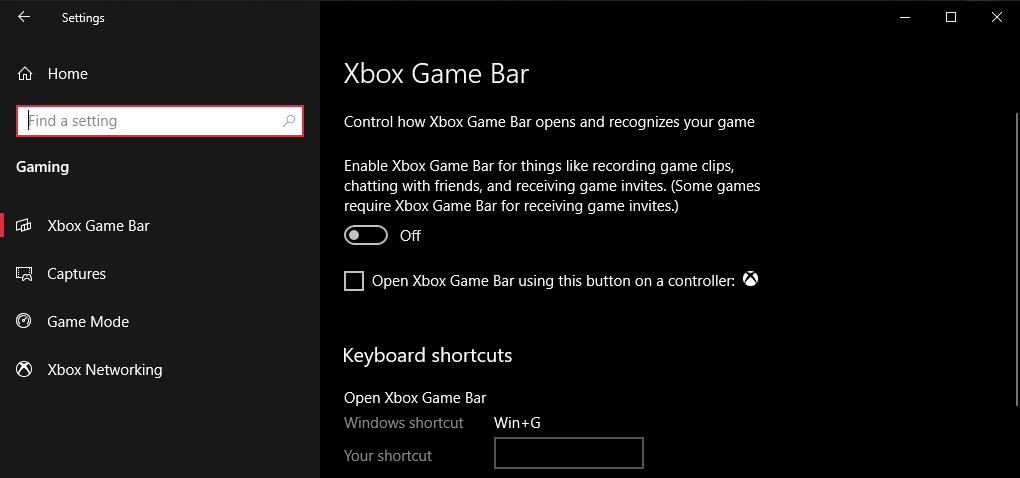
This will allow you to map new input to one more button on the gamepad.
Note: While this setup is only tested for Windows OS, the Adaptive Controller hardware should function equally well on Mac OS. However, using a different OS would require you to find and configure your own gamepad interpolation software.
Step 4: Configure Software
Setting up the software profile is the most complex step, but you only need to complete a full configuration once. After creating a correctly configured profile on one packing station, you can simply copy this file to every other station if they all use the same hardware setup.
Define Input Codes
Before we can program AntiMicro, we need to know the input values that will allow the gamepad to communicate with the ShipHero software.
At a normal packing station, ShipHero expects two types of input:
- Command codes: These instruct the software to perform a specific function. Command codes are always the same in any warehouse.
- Packaging types: These are labels for the types of packing materials used at a station. Packaging types are unique for every warehouse.
Listed below are common command codes:
- Print Labels: sh0002
- Print Invoice: sh0001
- Print Invoice & Label: sh0003
- Get Weight from Scale: sh0005
- Add Package: sh0010
- Take Parcelview: sh0009
- Complete Order: sh0004
Your warehouse may already use ShipHero's standard barcode commands cheat sheet. You can view the command cheat sheet by following this link.
When scanned by a barcode reader, these barcodes are translated into command codes that ShipHero can understand. You can view these command codes by opening a text document on Notepad or another text editor. With this file open, read a barcode using a scanner. A series of letters and numbers should appear in the text document corresponding to that specific barcode. For instance, if you scan the "Print Labels" barcode from the cheat sheet, the command code "sh0002" should appear in your text document.
Packaging types can also be determined by using a predefined barcode, a handheld scanner, and an open-text document. However, your warehouse may not assign barcodes to every package type. To view a complete list of packaging types unique to your warehouse, go to Shipping > Boxes in the ShipHero interface. You will need to know the codes for every category of packaging used at your station. You can learn more about setting up shipping boxes and assigning barcodes by reading this knowledge base article.
Run AntiMicro
Once you have a complete list of command codes and packaging types, you are ready to use AntiMicro.
After installing AntiMicro, you should see a new desktop icon. Double-click the AntiMicro icon to launch the program. The window should resemble this:
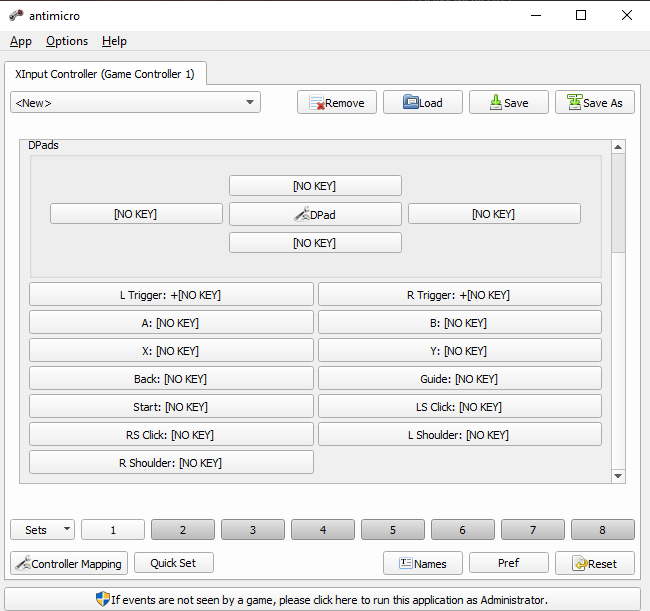
If AntiMicro cannot detect a gamepad, the screen will appear as follows:
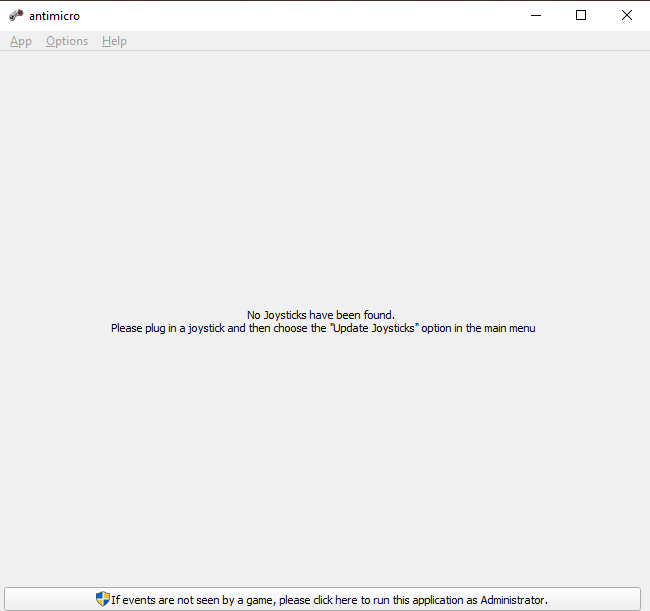
This blank screen indicates that something is wrong with the Adaptive Controller connection. Check your hardware configuration for problems.
Key Mapping
Once you have AntiMicro running and it has detected the Adaptive Controller, you can begin assigning new input.
Based on practical experience, we recommend using the A (left side) and B (right side) buttons on the Adaptive Controller to input command codes. Specifically, we find it convenient to use the A button as a multipurpose process-advancing trigger, and the B button to complete an order, as we have observed that assigning a totally separate "complete order" button reduces the chances for mistakes. We recommend using the peripheral buttons to input packaging types.
Here we will show you how we assign input to both the A and B buttons.
From the AntiMicro main screen, use the mouse to select the A button. This corresponds to the left large button on the Adaptive Controller.
Note: You can double-check your button layout by pressing any button connected to the controller. AntiMicro will highlight that button on the main screen.
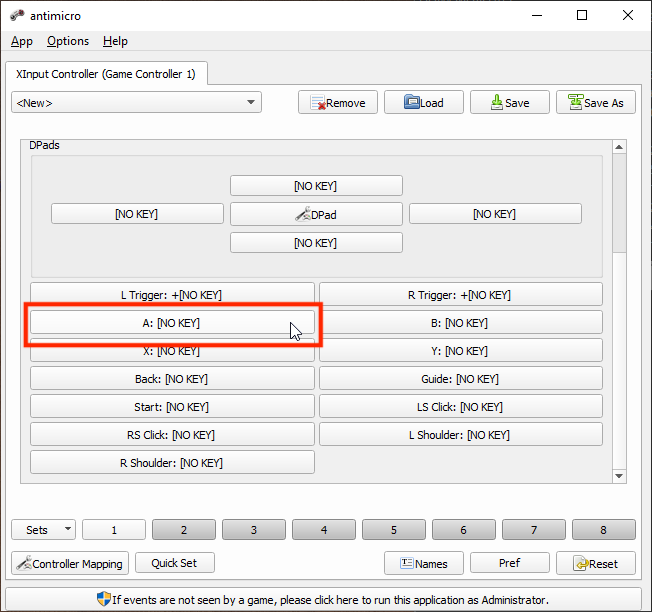
This will bring up the key assignment window. You can use the Name field at the bottom to create a descriptive name for the button. In the screenshot below, because no action has yet been defined for this button, the Current field shows "[NO KEY]".
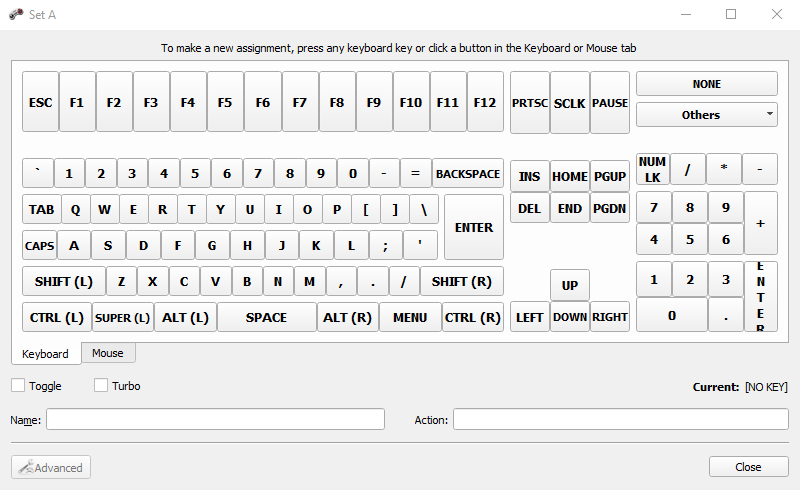
After creating a name for the button, select the Advanced button. In the example below, the name is "Print LabelInv Photo" because the A button will be used to take a photograph using ParcelView, then print the invoice and label.

The advanced keymapping settings allow you to define highly specific input from a button press. For the A button, we want a single press to trigger five actions:
- Input the Take Parcelview command, instructing ShipHero to take a photo using ParcelView
- Input the ENTER key
- Pause for half a second, a precaution that ensures ShipHero is ready to listen for the next command
- Input the Print Invoice & Label command
- Input the ENTER key again
We can create each of these five actions in sequential order. For the first action, we need to enter the command code for Take Parcelview. Using the cheat sheet, we know that this code is "sh0009". Begin by selecting the first tile at the top of the window, clicking outside the small blank rectangle. This will cause the tile to be highlighted in blue:

Use the central dropdown menu to select Text Entry, then input "sh0009" in the text field that appears below. Click the Insert button when you are finished.
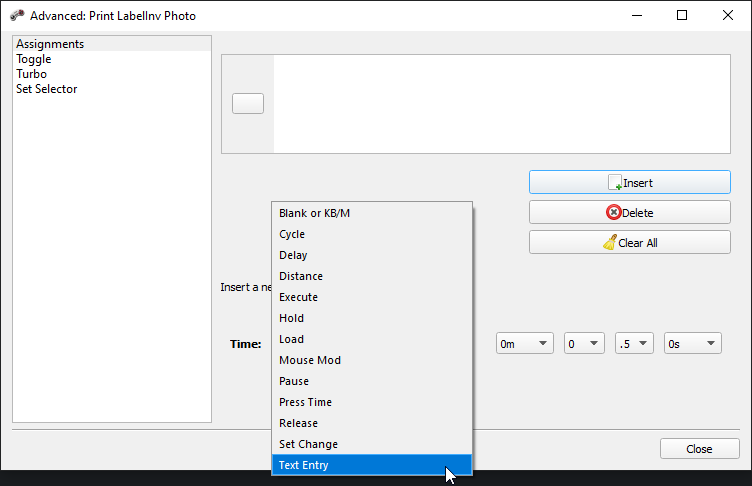
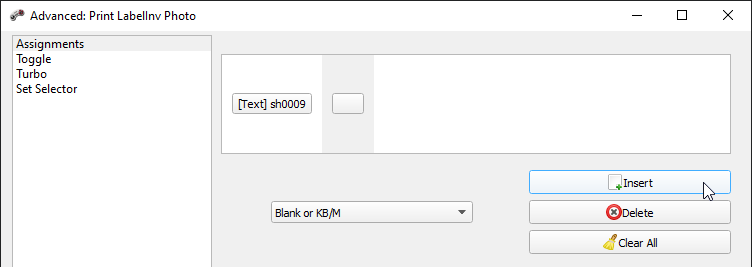
For the second action, we want to assign an ENTER key input. Begin by selecting the second tile at the top of the window, this time clicking inside the small blank rectangle. Clicking inside the small rectangle will cause it to show three dots:

Now press the ENTER key:

The second action is now defined.
For the third action, we want to assign a half second pause. Select the third tile, this time clicking outside the inner rectangle. This will cause it to be highlighted in blue:

Use the central dropdown menu to select Pause, then use the small dropdown menu that appears at the bottom of the window to specify the duration of the delay, in this case 0.5 seconds:
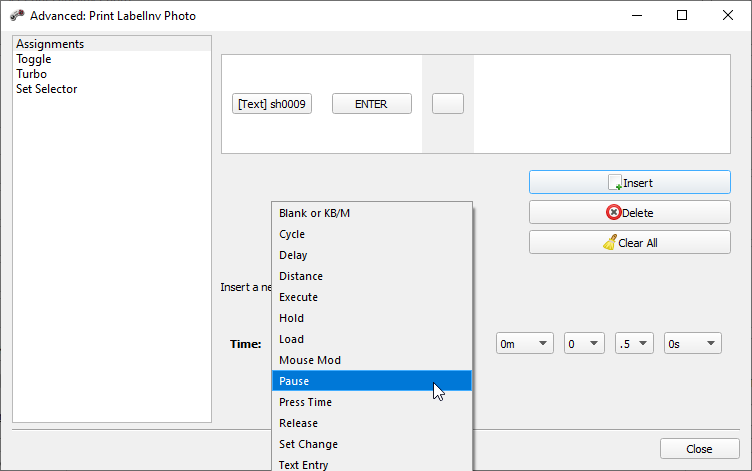
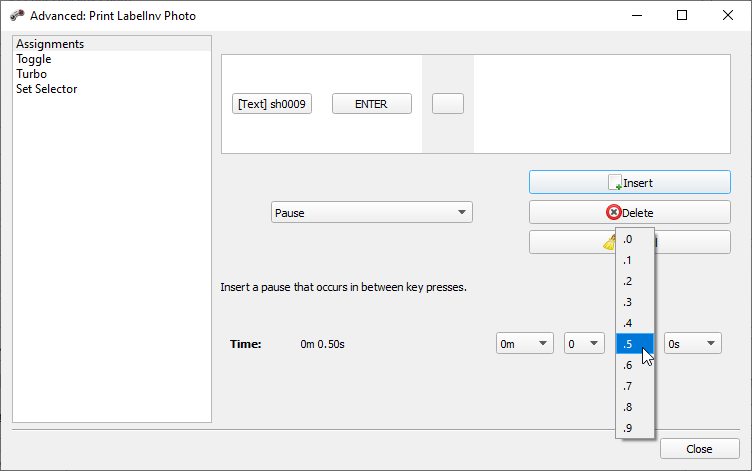
When finished, click the Insert button. The third tile should now read "Pause 00.50":

For the fourth action, we want to input another command code. Using the cheat sheet, we know that the code for the Print Invoice & Label command is "sh0003". Select the fourth tile, again clicking outside of the inner rectangle so that the tile is highlighted in blue. Use the central dropdown menu to select Text Entry, then input "sh0003" in the field that appears below. Click the Insert button when you are finished.


For the fifth action, we want another ENTER key input. Select the small rectangle in the fifth tile so that it displays three dots, just like for the first action:

Press the ENTER key:

All five actions are now assigned to the A button. You may now Close the Advanced window and the Key Assignment window to return to the main menu.
From the AntiMicro main menu, use the mouse to select the B button. This corresponds to the right large button on the Adaptive Controller.
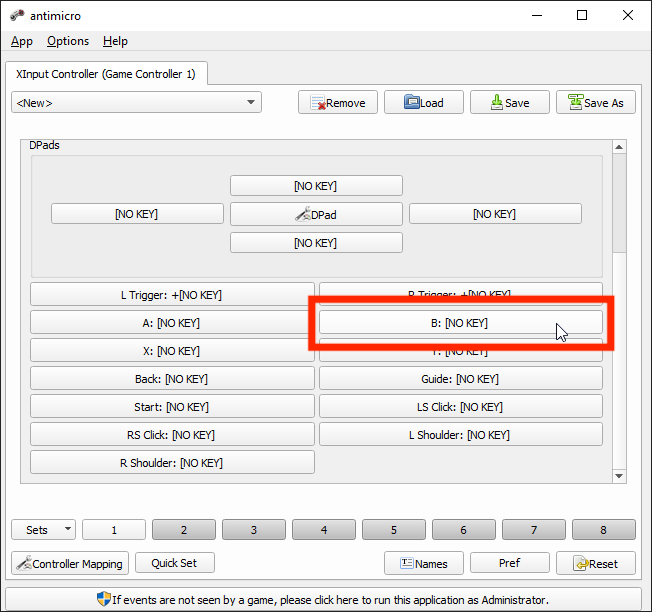
We will name the button "Complete Order" before bringing up the Advanced window:

This time, we want the B button to trigger two actions on a single press:
- Input the Complete Order command
- Input the ENTER key
Using the cheat sheet, we know that the command code for Complete Order is "sh0004". Begin by selecting the first tile by clicking outside the small blank rectangle:

Use the dropdown menu to select Text Entry and input "sh0004". Click Insert once you are done.

Next, select the second tile by clicking inside the small rectangle, causing it to display three dots:

Press the ENTER key:

Two input actions are now mapped to the B button.
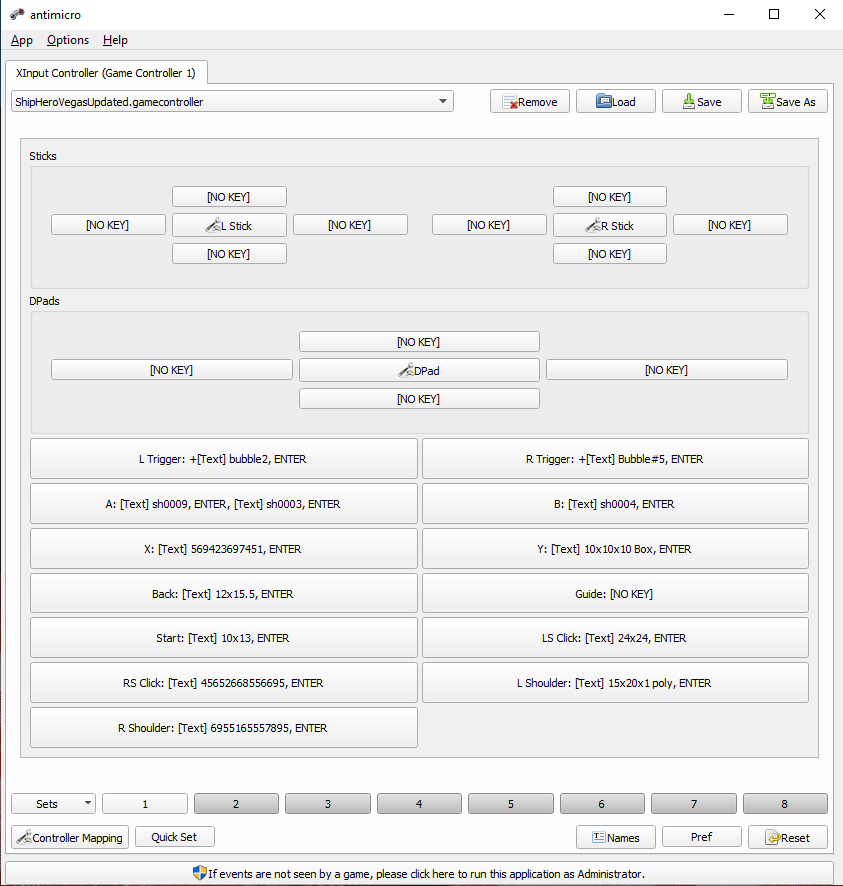
Assigning further input to peripheral buttons will depend on how many types of packaging materials you use at the station and which port they are connected to on the Adaptive Controller.
The example below shows the finished key mapping for an adaptive packing station:
Change Program Settings
After you have finished assigning functions to each button, it is very important that you select Save As on the main menu and name your profile. Ensure that the file is saved to your local machine so that it may be easily loaded every time the program starts up.
It is also very important that you change the AntiMicro settings to autoload this profile and to prevent packers from accidentally closing the program.
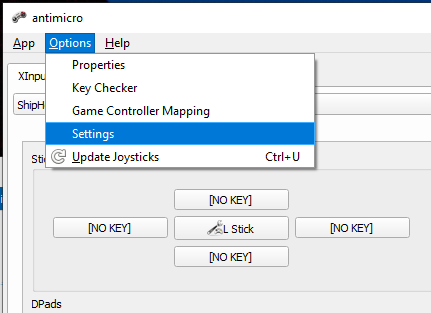
First, select Options > Settings.
In the left-hand menu, navigate to General. Here, check the boxes next to Close To Tray, Launch At Windows Startup, Auto Load Last Opened Profile, Launch in Tray, and Associate Profiles.
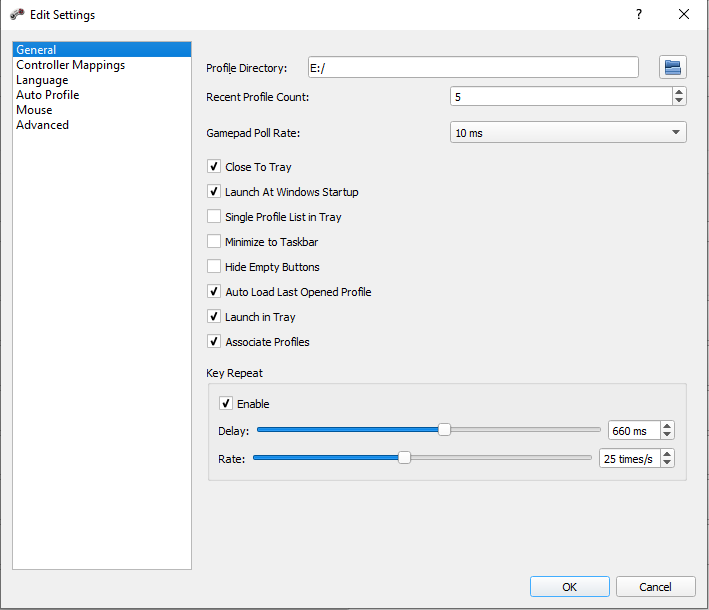
By selecting these settings, AntiMicro will start when the system boots up, load your customized input, and continue running in the background. By closing to the tray, it will also become less likely that the program will get accidentally deactivated while the station is in use.
Using these settings, running AntiMicro becomes entirely automatic, meaning that packing station users won't need to interact with the program at all.
Troubleshooting
When I try to open AntiMicro, the program window never appears.
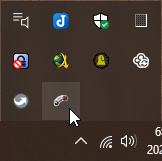
If AntiMicro is set to Launch in Tray, you will need to use the tray icon to display the program window. In the bottom right corner of your desktop, select the small arrow to show hidden tray icons. Click the gamepad icon to open the AntiMicro program window.
When I press a button on the Adaptive Controller, it doesn't work how I want it to or it doesn't work at all.
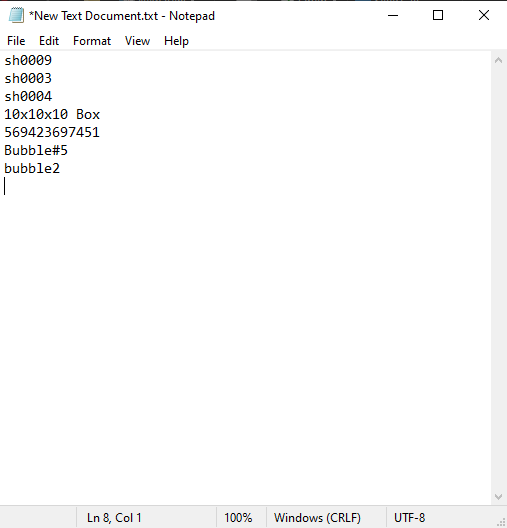
Open a Notepad text document and then press a button on the Adaptive Controller. You should see a text string corresponding to the input assigned to that button. Double-check that the assigned strings are correct. If no text appears, there may be a problem with the hardware connection.
Step 5: Copy Software to Packing Stations
After you have finished configuring the AntiMicro profile for one packing station, you can copy that profile to every other station that uses the same button configuration.
Profiles are saved as AMGP files. Copy this profile to a USB thumb drive and then save the AMGP file on the next workstation.
Once you have saved the AMGP profile on the next machine, open AntiMicro, select Load, and open the local file. Now navigate to Options > Settings and check all the same boxes as you did for the first machine.
Repeat this process for every adaptive packing station that uses the same layout.
Note: You can use AntiMicro to run different packing station hardware layouts as long as each layout loads a different AMGP profile. However, this will require extra attention to file version management and increases overall configuration time.
Conclusion
The cost to make this upgrade is nominal. In fact, it’s cheaper than a socket mobile scanner, which is what most of our clients use in their warehouses. The only hiccup right now is that, like many electronics devices, adaptive controllers and button kits can be hard to come by. If you’re looking to outfit a dozen stations, you might need to do it in waves instead of all at once.
If you’re interested in learning more about our adaptive packing stations, check out this blog here or reach out to the Client Support Team.